In my previous post “Does your Website Speak Multi-language?”, we discussed the concepts of multi-lingual websites and the hierarchies of locales, including the basic ideas of “country-first”, “language-first” and “grouped”. These hierarchies can influence the efficiency and ease of how your team manages your content. We also discussed synchronizations, translations and their differences and how you can decide upon a localization hierarchy by calculating how many synchronization and translation steps you require.
Once you have identified a fitting concept for your global site structure - congratulations! But it’s not the only thing you will need. Your Content Management System should also help your team with the daily task of managing a multi-language site. CoreMedia puts a big focus on the features and functionality that make translation and synchronization as easy as possible. Let’s start with the question of “What does the structure look like and what are the relationships between locales?”
Keeping an Eye on the Hierarchy
All editors can get an overview of all locales by opening the Sites app in the CoreMedia Studio. A tidy tree structure shows all sites the editor has access to, including all derived locales. As you can see below, our example site Calista has a root-locale of English (United States) and derives in various locales either by translation or synchronization
.
Figure 1: Sites app shows localization structure
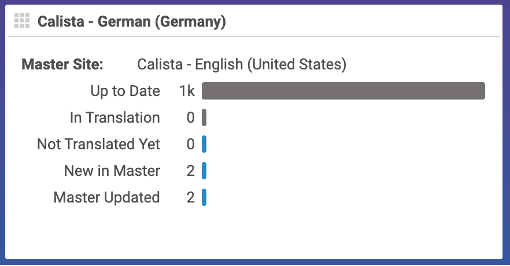
The icons help editors quickly identify the relationships between parent and child locales. Editors can add widgets on their dashboards for their translated locales. The widget provides information on one specific locale, such as how many items are translated already, how many need to be translated or where the parent site has updates that need to be adopted in your derived locale. This auto-updating widget can be configured multiple times to show the many locales that an editor needs to monitor.
Figure 2: Dashboard widget for translation status
So far so good for the big picture, but how about in detail? Can I see what the content localizes to and where it was localized from? Absolutely! Every content item in the CoreMedia Studio carries this information on the Localization Tab. As you see in the following screenshot, every content item links to its specific version of the parent locale and the derived locale. In this case, this is the localization tab for an article the editor called “The difference between style and fashion”. It was created in the English (United States) parent site and synchronized into the English (United Kingdom) and English (Ireland) markets.
Figure 3: Localization tab provides overview of content relationships between locales
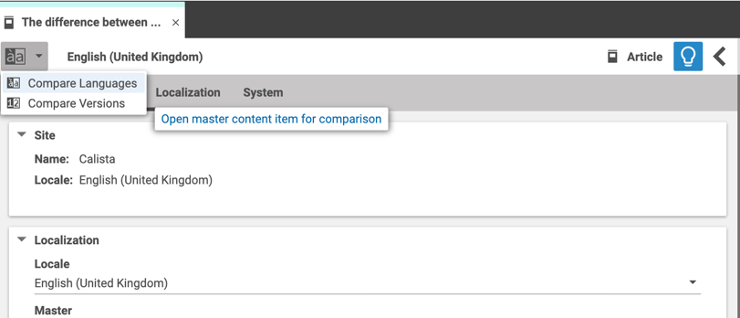
Clicking easily opens the localization variants in the Studio and also displays the version of the parent variant that the localization used. Using the menu at the top, the various versions of the content or the parent-child localization variants can be compared to each other at any time.
Figure 4: Compare functionality between content versions and languages
Now that we know how editors can stay on top of the hierarchy and the current status, let’s talk about workflows and how to manage a localization process.
Efficient Workflows
Translation or synchronization can be triggered via the Control Room. The Control Room is located on the left side of the CoreMedia Studio and provides a lot of functionality around content workflows. Let’s focus on the localization functionality for the purpose of this blog.
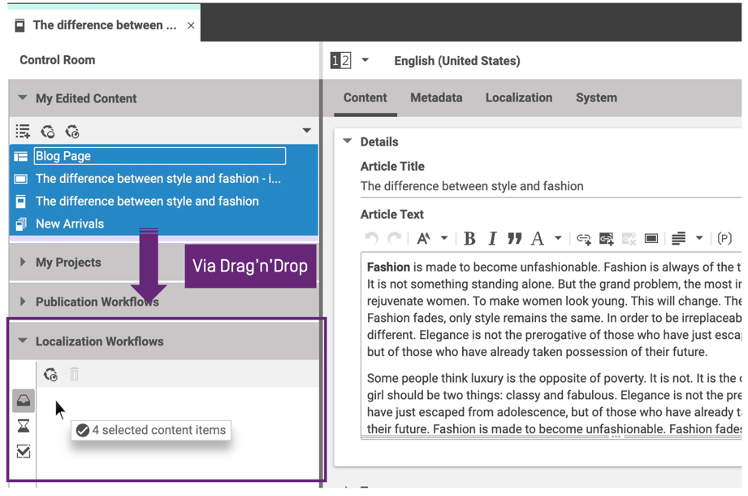
To start a localization, editors simply drag and drop the content items into the Localization Workflows area of the Control Room. This can be done from anywhere – the library, the campaign overview or from the opened content item directly.
Another option to start a localization is to use My Edited Content, also located in the Control Room. This section tracks what the editor is doing and lists all items the editor is working on. This is a great spot to find all content pieces at once and start the localization workflow.
Figure 5: Triggering a Localization Workflow from the Control Room
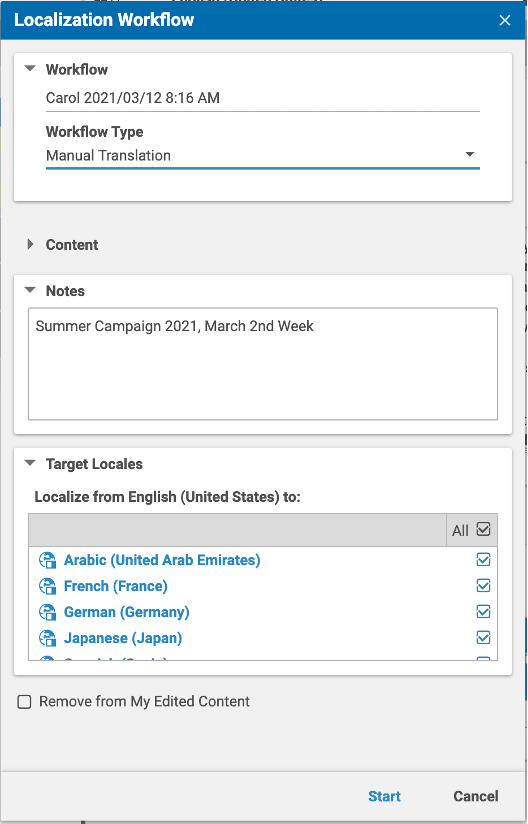
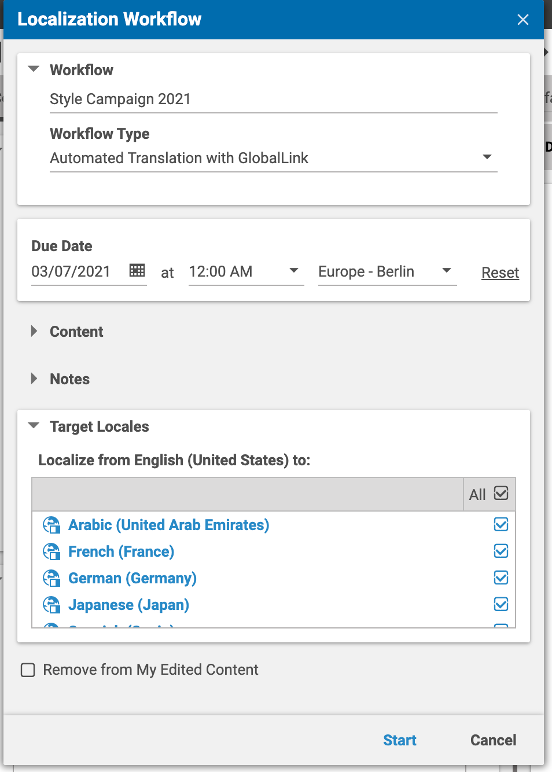
After you’ve triggered a localization, a dialog will open to configure the workflow. Here the editor can provide the workflow with a meaningful name, choose the type of localization (translation or synchronization) and select the target locales. Let’s go through the dialog step by step.
Figure 6: Localization Workflow dialog overview
Workflow: | Provide a name for the Workflow. This field is automatically pre-filled with the name of the editor starting the workflow and the date and time. |
Workflow Type: | Choose from the various options to Synchronize and Translate. |
Content: | List the content pieces that you want to localize in this Workflow. |
Notes: | Free text field for capturing information for others involved in the workflow or for journaling purposes. |
Target Locales: | Select the locales you want to Synchronize or Translate to. |
Remove from My Edited Content: | Option to clean the content in the My Edited Content section of the Control Room. |
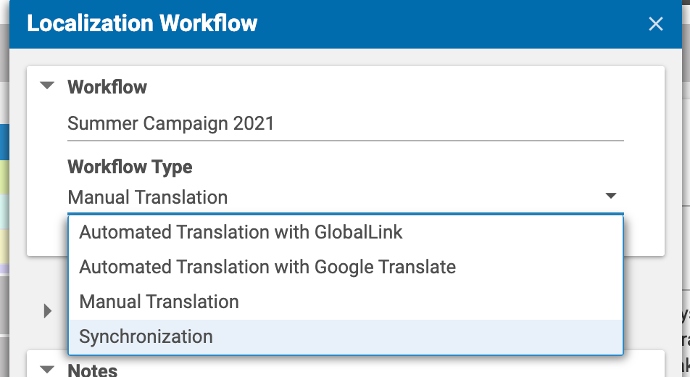
In our example, editors have four options for the Workflow Type, including Synchronization and three translation workflows:
- Automated Translation with GlobalLink
- Automated Translation with Google Translate
- Manual Translation
The first two options are integrations with external services and are examples of working with agencies or fully automated services. As the name suggests, Manual Translation does not work with an external entity, but rather sends the translation workflow to one or multiple colleagues on the editorial team who can perform the translation.
Figure 7: Workflow Type selection
Based on the Workflow Type selected, the dialog and the process will vary. In the following sections, we discuss the options for each localization type specifically. However, before we move on, we should discuss the sections that remain consistent across all workflow variations: Content, Notes and Clean-Up.
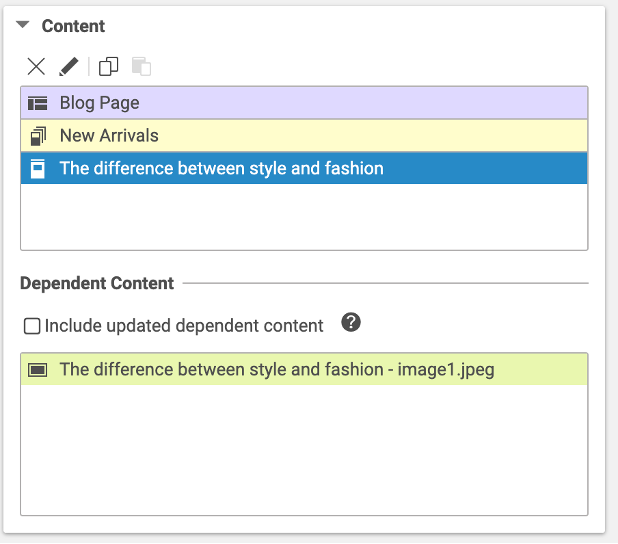
The Content section lists all of the items that the editor has added and are part of the localization workflow. Editors can open each item, remove them from the list and also drag and drop additional content pieces into this workflow.
Beneath that, the Dependent Content Section lists the items needed to complete the localization successfully. All untranslated items linked to the content in the top list will be automatically added to the Dependent Content list. This is a smart way that the tool helps the editor to stay consistent. Otherwise, small content pieces might be overlooked, resulting in frustration, delays and rework when the editor realizes that files were mistakenly left out of the now-finished workflow.
Figure 8: Content section of a Localization Workflow
The Notes section is a straightforward text field. The content is saved with the workflow itself, so an editor’s notes are sent to the agency or automated translation service and always stored for journaling purposes.
When the Remove from My Edited Content section is selected, content items are cleaned from the editor’s My Edited Content section after the first workflow step is triggered. This is a simple clean-the-plate for the editor, so the next campaign or work piece can be managed without any leftovers from the last task.
Now, what about the specifics for the different localizations – translation and synchronization? While they work very similarly, there are differences, so let’s look at them individually.
Synchronization
A synchronization workflow is a very straightforward one-step workflow. Translation is not needed, therefore there is no explicit verification step. However, conflicts may arise due to manual changes to the derived child locales. Typically, when websites use synchronized content for different markets, the parent page is the only edited page and editors do not change the derived locales directly. But there are exceptions, for example, on an About or Contact page, where regional details are edited or an Events section that focuses on a specific country or market.
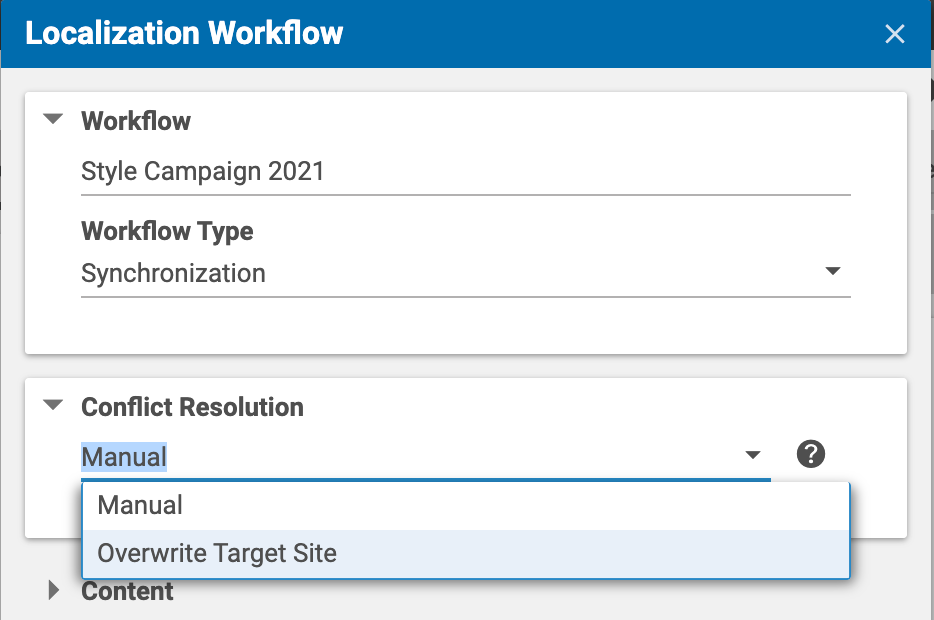
When the editor selects the Workflow Type Synchronization, the Conflict Resolution section appears. In the Out-of-the-Box option, editors can choose between a manual correction or to force the content from the parent to the child by overriding the target site’s content.
Figure 9: Conflict Resolution options for Synchronizations
Manual: | When there are conflicts, the workflow escalates. Editors must resolve the conflict and restart the synchronization. Editors can use the side-by-side view to compare both versions. |
Overwrite Target Site: | When there are conflicts, the content of the master site will overwrite the conflicting content on the synchronized site. |
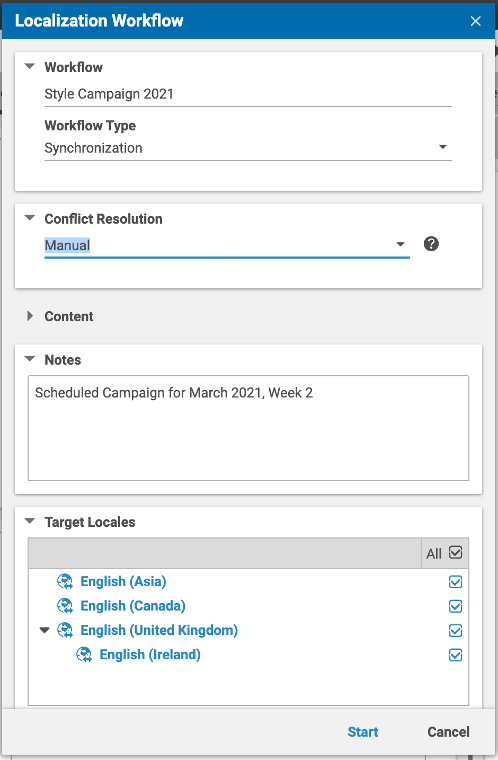
After choosing the Conflict Resolution type, editors select the target locales. The system automatically lists all available sites that have a synchronization relationship with the parent site. Editors can synchronize individual or multiple target locales at once.
Figure 10: Localization Workflow dialog for Synchronization
After finishing the remaining sections of the Workflow dialog, the editor presses the Start button. The synchronization begins and typically finishes in a very short period of time.
If would like to see how this works, here’s a short recording of a sample synchronization workflow:
![Video preview]()
The following video is hosted on YouTube.com, a third party service to www.coremedia.com. By clicking you accept the data privacy terms by YouTube.com.
Synchronization Workflow Video
Translation
A translation workflow is usually a multi-step workflow, where editors send the content to either an external translation service or to internal team members who are experts in the target locales. For automated translation, the workflow returns to the originator for a verification step.
![Video preview]()
The following video is hosted on YouTube.com, a third party service to www.coremedia.com. By clicking you accept the data privacy terms by YouTube.com.
Manual Translation Workflow Video
![Video preview]()
The following video is hosted on YouTube.com, a third party service to www.coremedia.com. By clicking you accept the data privacy terms by YouTube.com.
Automated Translation Workflow Video
Editors start the translation workflow by selecting the available Workflow Type. CoreMedia Content Cloud is very flexible and can support multiple workflows with different procedures or services behind the scenes. Similar to the synchronization workflow that had the Conflict Resolution selection, translation workflows can also have further configuration options.
The following example shows the translation workflow that uses the connector to GlobalLink (translations.com). This commonly used Translation Management System provides a wide range of automated and high-quality manual translation services. This external service uses XLIFF, which is the industry-standard file format for translations. You have the option to provide details to the external service, such as a requested delivery date for the translated content, which is very important when translation isn’t fully automated.
Figure 11: Localization Workflow dialog for Automated Translation
Our UI can be customized to your needs, in this example by adding a Due Date field. CoreMedia Content Cloud is fully extendable, and the existing workflows are customizable.
Similar to synchronization, the editor can now choose the Target Locales. Each target locale will be handled in its individual workflow unless otherwise customized, allowing each locale to be translated and verified without waiting for the others to be completed. Editors can still wait for the actual publication workflow to harmonize the Go Live for your global content, if desired.
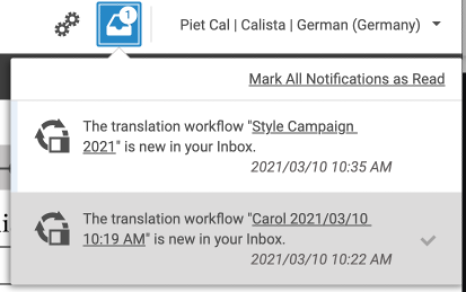
After finishing the remaining sections of the Workflow Dialog, the editor presses the Start button and the translation workflow begins. If the editor choses an automated option, the content will be sent to the service or agency immediately. For manual translation, all editors eligible to perform the translation will be notified immediately. The eligibility of editors is defined via the Rights and Roles Concept. From now on, let’s call this editor the “translator” to separate them from the editor who triggered the localization.
Translation
Figure 12: Workflow notification for Manual Translation
While the translation step is being executed, the editor can monitor the workflow and escalate or abort the process, if needed. To do this, the editor opens the Control Room and navigates to the In Progress section of the Localization Workflows area.
Translation
Figure 13: Control Room section Localization Workflows shows translation workflows in progress triggered by the editor
For an automated translation, the actual process of translation happens behind the CoreMedia Studio scenes, so let’s focus on manual translation in this blog.
After receiving the notification, the translator opens the Control Room to find the translation process in his or her inbox:
Translation
Figure 14: Control Room section Localization Workflow shows translation workflows in the translator’s inbox
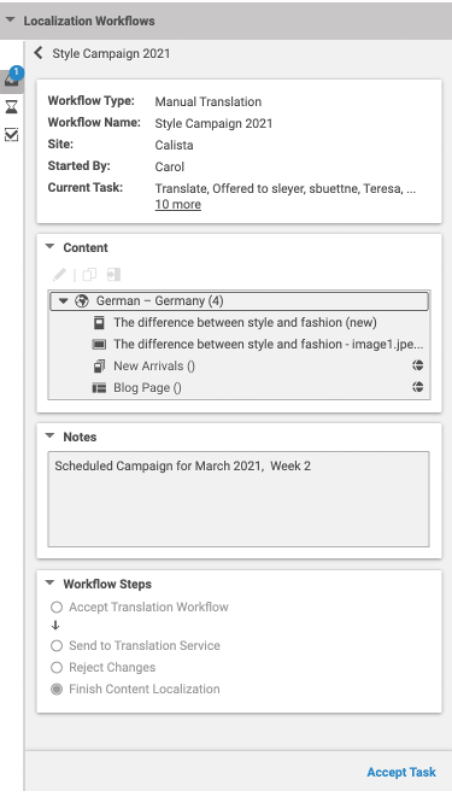
The translator can open up the workflow and view the content items, all other translators that this task is attached to, the notes, and any other important details to determine whether to accept the task. The accept step is required to prevent multiple translators from working on the same translation in parallel. However, multiple translators can work simultaneously on different target locales.
Figure 15: Control Room section Localization Workflows shows translation workflows in the translator’s inbox (detail view)
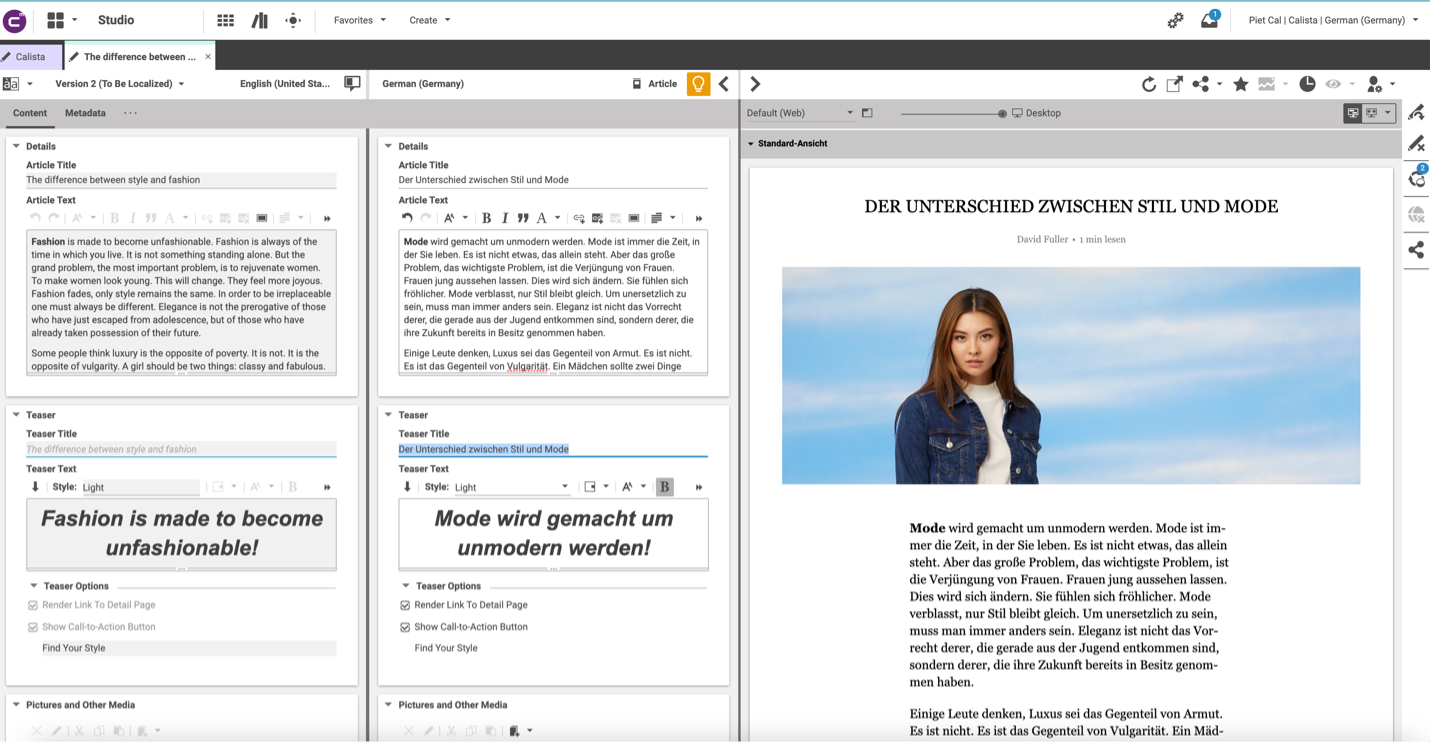
After accepting the task, the translator can start work by opening each item in a convenient side-by-side view. The parent locale is on the left-hand side of the screen and the target locale is on the right-hand side. Every field or linkage can now be adjusted by the translator.
The translator can also open the fully integrated real-time preview and see exactly how the translated version will look. As we know, different languages have different characteristics. Often text that fit perfectly in one language won’t fit in the same area in another language. In the Studio, editors are able to truly optimize the content for each locale: adjusting text lengths and paragraphs, using localized media assets, positioning overlay text for the teaser representation that is properly adjusted for the text length, the associated author and so much more. All this while using the integrated experience orchestration for all output channels. The side-by-side view makes it very easy for the translator to see what was already adjusted and what was used in the original.
Figure 16: Side-By-Side view for manual translation step
To complete their task, the translator chooses the option Finish Content Localization in the Control Room. The content is now ready to be published with or without an advanced publication workflow. This completes the workflow for the translator.
Figure 17: Finishing a Localization Workflow in the Control Room
For an automated translation, the editor follows the same steps as in the manual translation scenario. Only in this case, the translation service or agency returns the XLIFF file, which is automatically imported into the content repository. Just like the translator, the editor receives a notification and finds the workflow in his or her inbox in the Control Room.
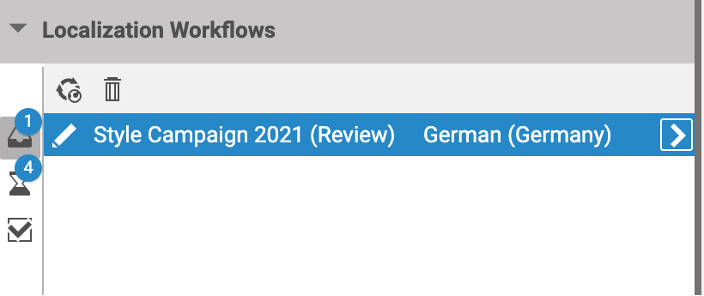
Figure 18: Control Room section Localization Workflows shows automated translation workflows ready to review in the editor’s inbox
The editor can open each item in the side-by-side view and verify the translations. If needed, the editor can also adapt the content to each locale with market-specific assets or other details. If the translation is not up-to-par, the editor can reject the translation and send it back to the service or agency for revisions.
All completed translation workflows will be added into the Completed section of the Localization Workflows area of the Control Room and can be reviewed if needed.
Summary
While localization for a global website is not easy, it can be handled efficiently. A Content Management System and optimized concept for the locale hierarchies can provide the editor with easy-to-use workflows and powerful features to effectively manage multi-language content.
If you are interested in learning more about localization or would like to see a demo of our CoreMedia Content Cloud platform in action, please contact us.